
Since I took out the sewing machine to make the crib rail guard, I went ahead and finished a couple other baby sewing projects. When we set up the nursery, we envisioned having an Ikea EXPEDIT/KALLAX shelving unit with baskets to store the toys. We never got around to getting the shelving unit nor the storage baskets. Instead, we used the galvanized metal bucket (the one we used to put him in for the newborn photography) to store all the toys and it was working great until now. Once he started crawling everywhere and putting everything in his mouth, he started biting on the metal bucket so I had to take it away.
I made a few of these fabric bins to store the toys in the nursery as well as in the living room. They are decent size, and when we finally get the EXPEDIT/KALLAX shelving unit, they will fit right in!
Materials:
- 1 piece Outside Body (I suggest a medium/heavy weight fabric, this is what I used)
- 1 piece Inside Body (if you are making this reversible then pick a medium/heavy weight fabric, I don’t plan on using it as reversible so I used a linen fabric)
- 1 piece Outside Bottom
- 1 piece Inside Bottom
- 5 pieces interfacing (I used Pellon 808)
- Matching threads
- 4 sets of 1/4″ metal eyelets
- Polyester or cotton cord that can fit through the eyelets
Notes:
- Always pre-wash and pre-shrink all fabrics before starting
- Seam allowance is 1/4″ all around
- The finishing size of the bin is 10″L x 10″W x 12″H
- I have enough fabric to make 4 storage bins using 2 yards of each Outside Fabric and Inside Fabric, 4 yards of polyester cord, and 3 yards of interfacing (I intentionally set the size to 10x10x12 to minimize fabric waste based on the fabric I’m using)
Step 1: Cut 2 pieces of Body (1 piece of each in Outside fabric and Inside fabric) to measure 40 1/2″ x 13 1/4″.

Step 2: Cut 2 pieces of Bottom (1 piece of each in Outside fabric and Inside fabric) to measure 10 1/2″ x 10 1/2″.

Step 3: Cut 5 pieces of interfacing to measure 10″ x 10″.


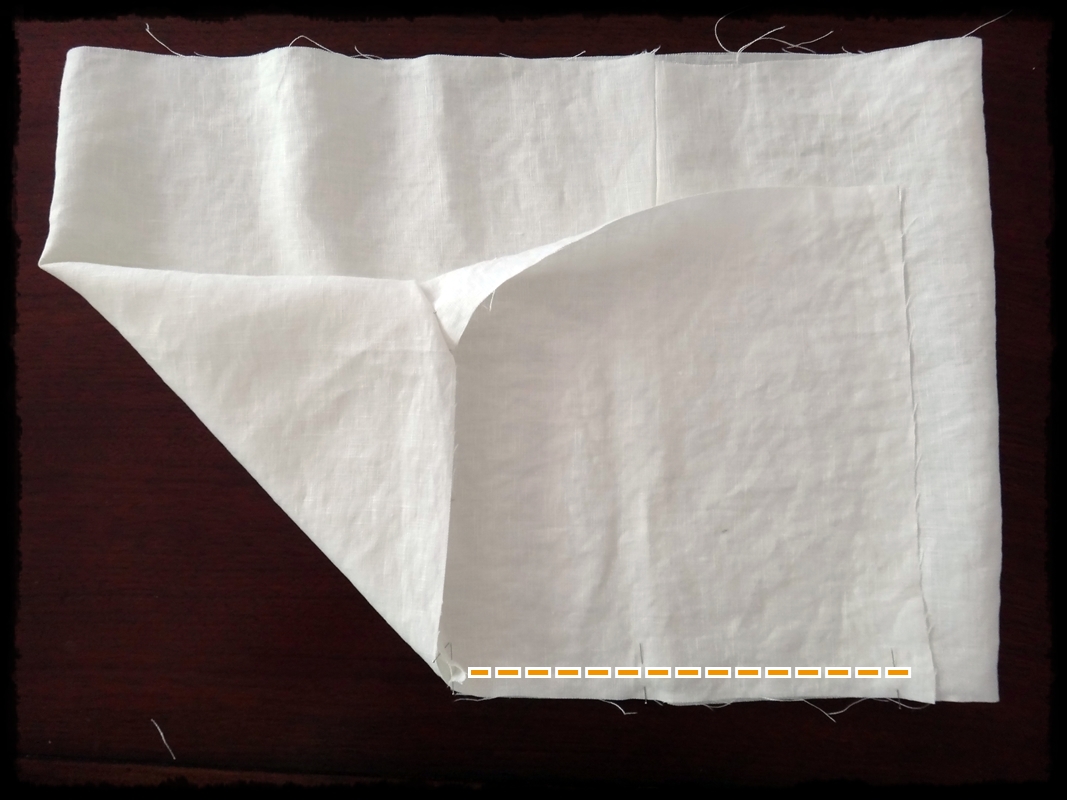
Step 4: Fold the Body in half, Right side together, along the long edge, and sew a 1/4″ seam allowance (see orange dotted line shown). Sew Outside Body and Inside Body separately.

Step 5: Press seam open.

Step 6: Iron on 4 pieces of interfacing to the Wrong side of the Outside Body following instruction approximately 1″ from top and 1/4″ from bottom and both sides. I ironed the first one aligning the center of the interfacing to the pressed seam so it is easier to iron the other three.

Step 7: Iron 1 piece of interfacing to the Wrong Side of the Outside Bottom, aligned at the center. Pin one edge of Bottom to the Body, Right side together, aligning with the interfacing. Sew a 1/4: seam allowance (see orange dotted line shown). After you finished sewing one edge, pivot the fabric to continue sewing the next side of the Bottom to the Body. Continue until four sides of the Bottom are sewed to the Body. Sew Outside Body/Bottom and Inside Body/Bottom separately.
Step 8: Fold and press 1″ from the top, Right side together.

Step 9: Edge-stitch the top to close (see orange dotted line shown). Add 2 eyelets 4″ from the top and 5″ apart. Add another 2 eyelets on the opposite side of the storage bin. (This is if you plan to fold the top of the bin by 1″. If you want to leave it unfolded, you may want to move the eyelets up by 1-2″.)

Step 10: Cut a 16″ cord and insert into the eyelets, tie knots to secure cord. Fold down the top edge inside out by about 1″. It should fold easily since that’s the part without interfacing inside.

I love how it turns out. It is big enough to hold a lot of toys but not too big that it becomes bulky. The interfacing is not too thick so the bin won’t look too rigid. It is so satisfying seeing my baby pull on the cord and grab toys out of the bin. I’m looking forward to that day when he can put the toys back into the bin at the end of the day

Photos taken by Vean Chen

Nice DIY .Useful
_______________________________________________________________________
Hi 🙂
Please check out my blog http://unsmileys.wordpress.com/ & http://unsmileys.co.vu/ if you want 🙂 Thank you so much.It means a lot. And you have a really nice blog 🙂 Best wishes
Happy blogging 🙂
LikeLike
Pingback: Pacifier Clip | muah * g
Pingback: Baby Shower Gift Guide | muah * g